Entity Framework & Windows Phone: Part 1
July 24, 2012Entity Framework & Windows Phone: Part 1 | Part 2 | Part 3
Back when I got my first Windows Phone (November 2010), I started taking a look at developing for the platform. I found that there was no database access I could use to store large amounts of info easily. The way I worked around this in early, unreleased apps was by serializing and de-serializing XML files in Isolated Storage. It was terribly tedious. With the mango release we finally had a DB to use. Happy days! But it still took writing classes by hand. I spent that whole weekend creating DB classes for various apps then discovered that I could use SqlMetal to create classes from SQL Compact files. I was excited and tweeted:
HOWTO: Using SqlMetal to generate Windows Phone Mango Local Database classes : Dammit, I wrote mine by hand!: windowsphonegeek.com/articles/Using…
— Adam Benoit (@AdamBenoit) September 7, 2011
Now all I had to do was create the SDF files and I was in business. I had been using entity framework to create SDF files for data storage in WinForms apps so that’s what I used.
Along the path to a process I have made mistakes here and there. Had to start over more than a few times but have smoothed out all the bumps into a fairly simple process. For me it was practice makes perfect and I have certainly practiced this one enough. 
The following are required in order to implement this walk-through:
- Windows Phone SDK 7.1 + Update 7.1.1
- Entity Framework (If you have .NET 4, you should have this already)
- Entity Designer Database Generation Power Pack
There are 3 parts to the process:
- Create Data Model using Entity Framework
- Generate a database from the Model and generate data classes from database using SqlMetal and modify for Windows Phone
- Add the resulting data classes to Windows Phone project and setup for consumption.
As part of this article, we are going to create an app to store ideas for other apps.
You can grab the source code here.
Part 1: Create Data Model using Entity Framework
In order to start building the data model, we need to stop and think about the data we are going to store. I usually start an app my building the different views but since this app is fairly simple, we will jump right to creating the model.
- Create a new solution called “AppTracker” with a Windows Class project called “AppTracker.Entities”. NOTE: Be sure you are targeting the .NET Framework 4 or some things we are about to do will not work.

- Delete the class1.cs file.

- Right click on the AppTracker.Entities project in the Solution Explorer and add to the project a New Item. In the Add New Item dialog, under Visual C# Items in the Data group, select ADO.NET Entity Data Model and name it AppTrackerDataModel.edmx

- On the next dialog (Entity Data Model Wizard), select Empty Model and click the Finish button.

- We now have an empty workspace to visually build our data model.

- Easiest way to add new entities (which will become tables in the db) is to right click on the work area and select Add… then Entity…
In the Entity Name field, we want to put the name of this bit of data. Fill it in with “Idea”. Notice we entered it as a singular. When you do that, the Entity Set field is automatically set with the plural version. Leave the Key Property as is so we will end up with a primary key in the resulting db table. Now we can click OK.
- Now we can start adding properties to our first entity. There are 3 ways to add properties: Right click the workspace, drag from the toolbox, or my favorite, pressing the insert key after clicking the Properties header in the entity.

- At this point I usually use the insert key and add all of my properties one after another without setting their data types. Once I add all I need I then use the Properties Viewer to set the types from the top of the list down. I’m going to add 2 string properties. String is the default data type so that’s convenient.

- The next step is to add another entity for category info. Right click on the workspace and click on Add… Entity… Again, we fill in the singular and the plural is done for us.

- Now that the Category entity has been added, lets add the Name property. One trick I use is to copy and paste from other entities. In this case, I copied the name property from the Idea entity and pasted it into the Category entity. This is a great way to save time. We will also need to add a CategoryId int property in the Idea entity as well.

- In the toolbox you will find the Association tool. Click on it and then click and drag from the Category entity and let go over the Idea entity. This creates a One-to-Many relationship. Each Idea can have only one Category and each Category can have many Ideas. This is reflected in the Navigation Properties: The Idea entity is linked to a single Category and the Category one links to multiple Ideas.

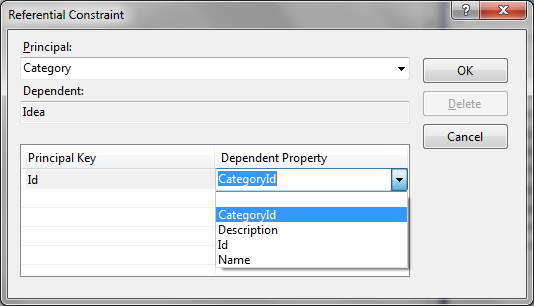
- Now double-click on the connecting line to set the Referential Constraint. This will become the foreign key constraint in the DB and will make the Navigation Properties work correctly in the generated data classes. We want to set the principal to the Category entity because that is the entity where the Id property is. When making One-to-Many relationships, the Dependent property usually contains the Principal entity’s name in it.
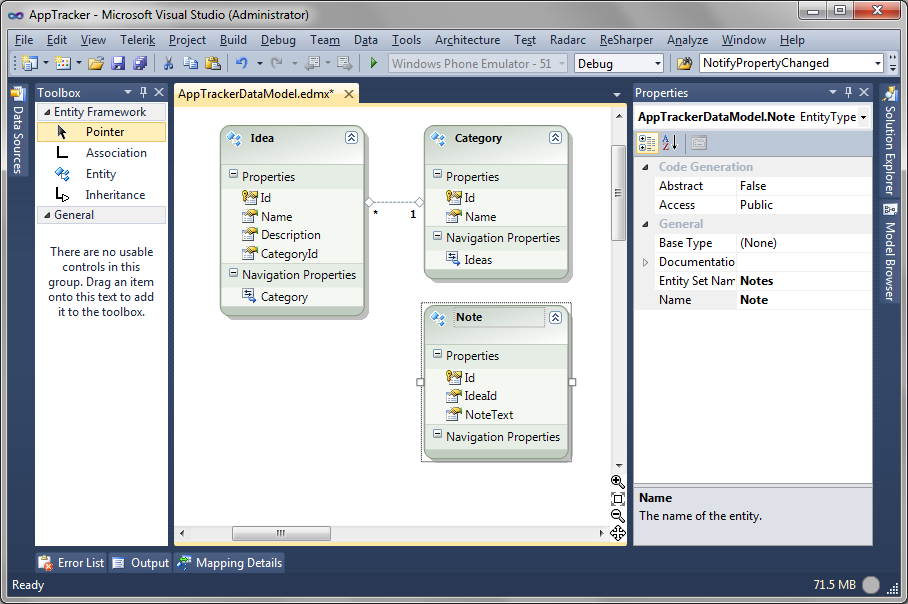
- Now we add the third entity Note. This is where we will Store notes about the Idea. Notice the IdeaId property is in the Note entity.
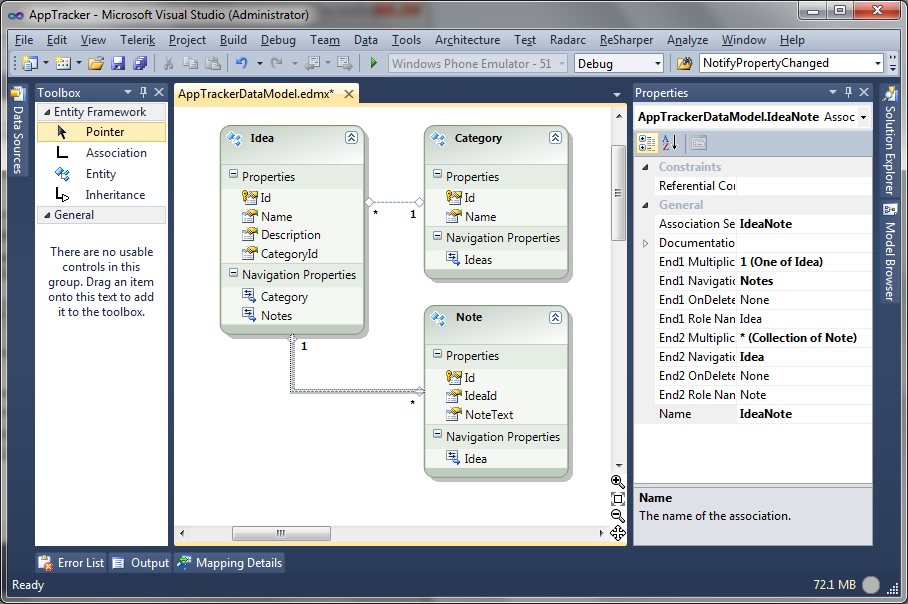
- We will be making another One-to-Many relationship but this time it will be each Idea with many Notes and each Note with one Idea. Click the Association tool again and this time click on Idea entity and let go over the Note entity. Notice the direction of the relationship is reversed from the other one we made. Also see the Navigation properties now reflects this as well.
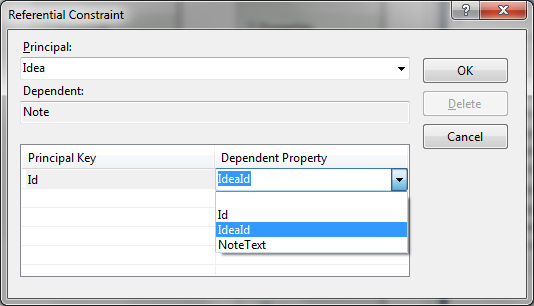
- Now double-click on the connecting line to set the Referential Constraint. This time we want to set the principal to the Idea entity and the Dependent Property would be IdeaId.
- Now is the time to save and take a look in the Error List that will pop up if there are any issues. Red errors must be fixed but yellow warnings about entities not mapped are okay, as soon as we generate a DB file it will take care of itself.
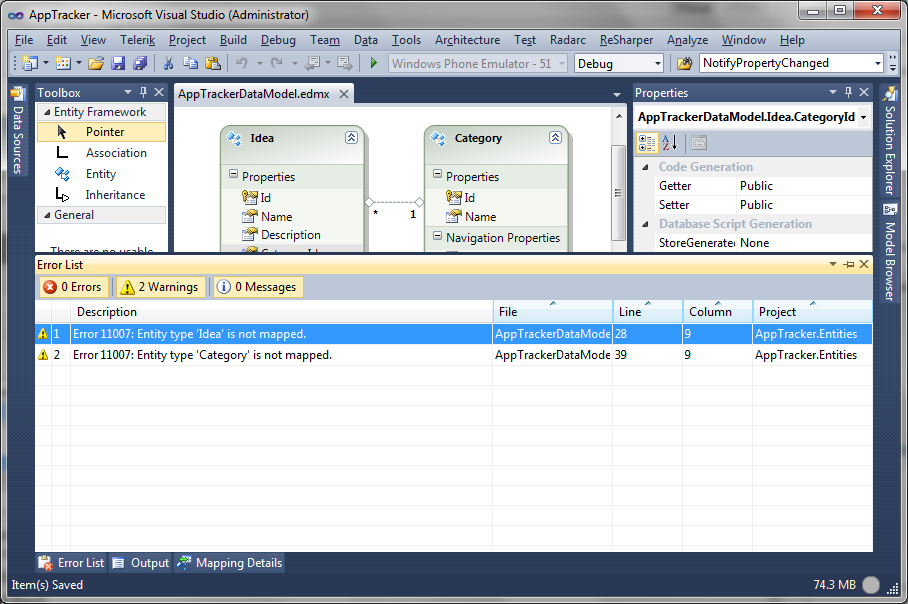
That’s it for Part 1 of 3. We have created a basic data model in Entity Framework. In the next part we are going to generate the database file and then use SQLMetal to generate the data classes.



4 Responses to Entity Framework & Windows Phone: Part 1
Pingback: Entity Framework & Windows Phone: Part 1
Pingback: Entity Framework & Windows Phone: Part 2 | Adam Benoit
Pingback: Entity Framework & Windows Phone: Part 2
Pingback: Entity Framework & Windows Phone: Part 3 | Adam Benoit